Printing the targets
The Principle
To make a custom printer profile we need to measure exactly what colours a printer actually prints without any interference from any software in your work flow.
In order to measure this you need to print the supplied target files without ANY colour management being applied AT ALL at any stage. All the targets need to be printed with exactly the same settings.
The same principle applies with all printers, all printing software and every operating system.
Each target will fit onto a single A4, or US letter, landscape sheet of paper. Do NOT resize them to fit. If you are printing on roll paper, please do not cut the targets exactly round the dotted limits, but leave an extra margin of about 2cms at the top of the box for handling purposes.
Once the targets have been printed leave them to dry fully, check them visually to ensure that the dotted box is the correct size on all sheets and that the blue and green reference squares in columns A,B & T don't vary in colour between different sheets.
Please carefully package the targets with a sheet of plain paper between each sheet to prevent any damage, preferably with a sheet of card to prevent damage in transit, fill in the order form and send it all to us. To ensure prompt delivery check that the package is correctly stamped with the correct amount.
Much of the detail below duplicates the instructions elsewhere on how to set up and use colour management. Please make sure you double check what's written below before printing out the targets.
Printing software settings
Printing software must be set to NOT to impose or change the colourspace of the file and NOT to apply any sort of profile to the image sent to the printer. Please read the instructions for each manufacturer and follow them exactly.
You may be surprised having read the above that the first instruction in most sections will be to turn colour management ON, not off. The reason for this is take control of the colour management system away from the operating system defaults to ensure that no profile is unknowingly applied.
Adobe Products
Photoshop colour settings (all versions)
It's important that no colour management is ever applied to the target files prior to printing. In Photoshop this is controlled by the 'Color settings dialogue' found in the edit menu.
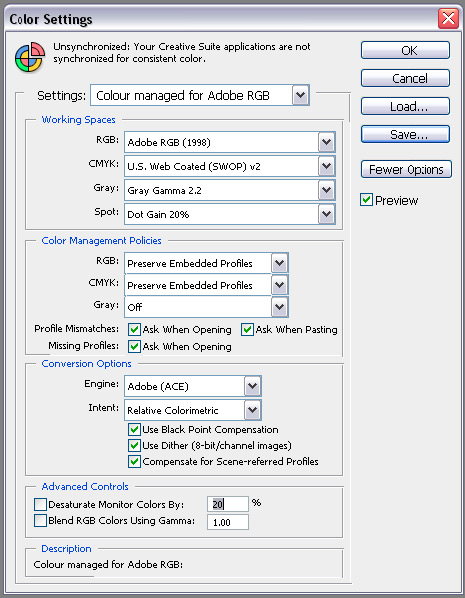
The important settings are in the color management policies section. Preserve embedded profiles, coupled with Missing profiles 'Ask when opening'
This should ensure that when you open the target files which are untagged you get asked if you want to assign a profile or leave it untagged.
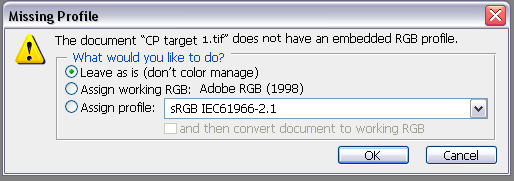
You must leave it untagged.
Photoshop 5.5, 6, 7, CS
Photoshop is probably the best and most powerful image editing program available. It has a very complex and powerful set of colour management tools available, but that power also means great care needs to be taken to ensure that one of the settings is not altering the targets prior to printing.
Please ensure that the colour management settings are as suggested in our page on setting up colour management so that no profile has been applied to the target.
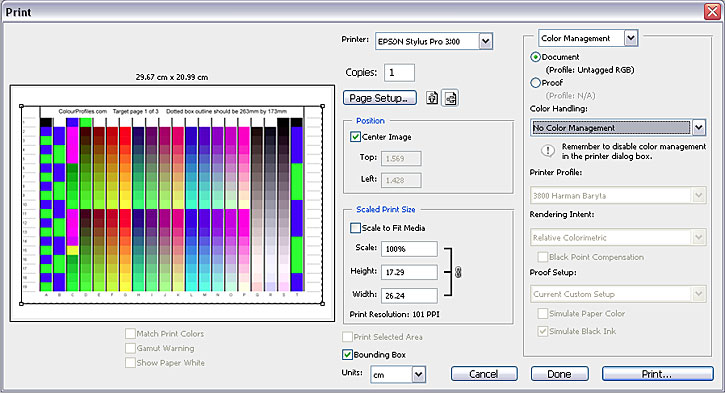
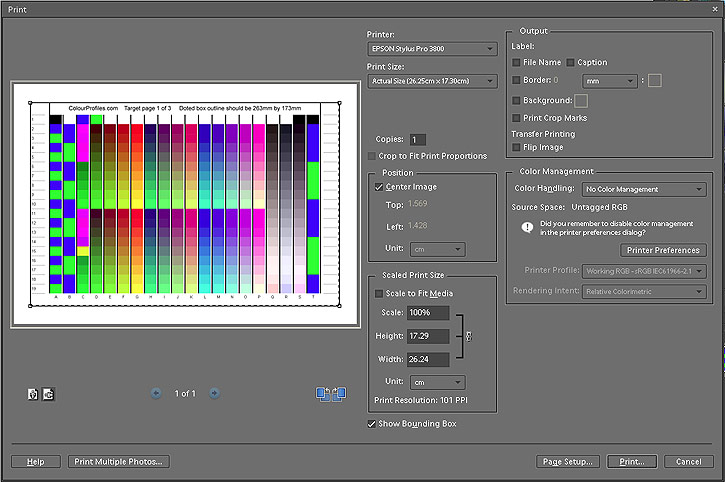
To print the target load the files into Photoshop, at this point you should be told the file has not got an embedded color profile and asks you how you wish to proceed, choose "Leave As Is (don't color manage)", and then open Print Preview option on the File menu.
Click the "Show More Options" box on the bottom left of the window.
In the drop down box choose "Color Management"
You should see the "Source Space" listed as Untagged RGB.
In "Print Space" select the profile "Same As Source"
Then set up the printer with the "Page Setup" dialogue as needed for your particular printer.
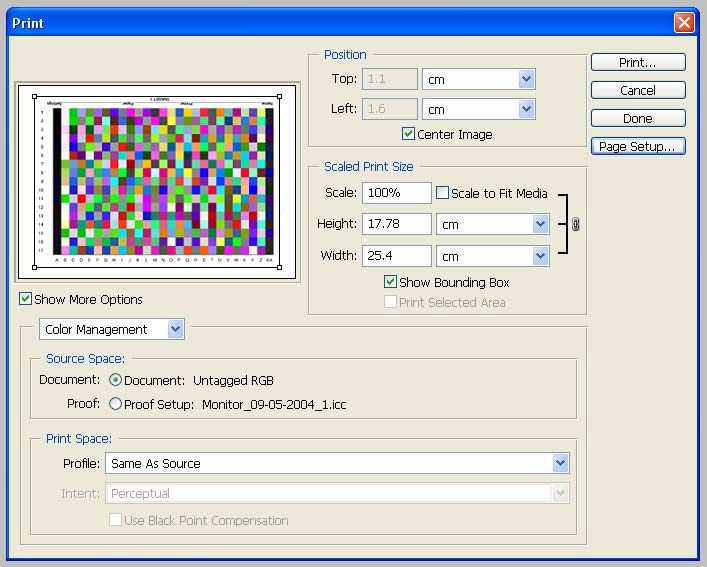
When you've finished setting all the printer settings, double check the "Print Space: Profile" setting, it often defaults back to a previous setting.
Then print the targets.
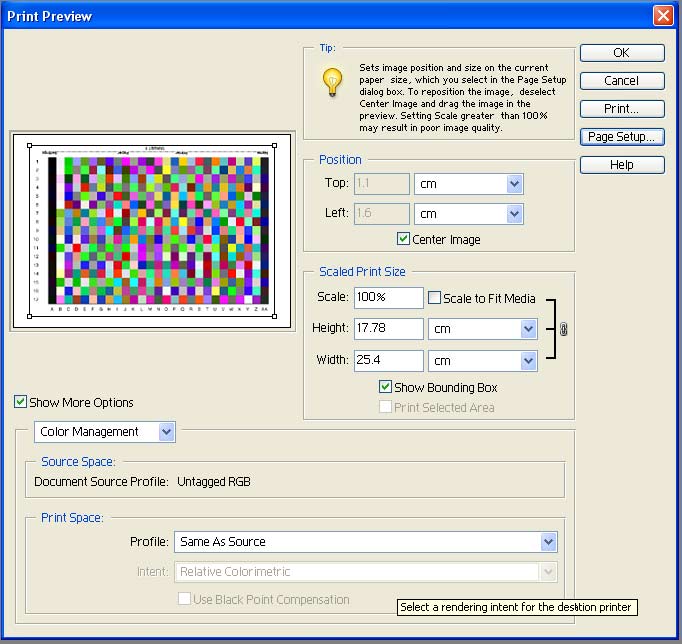
Photoshop CS2
Photoshop CS2 somewhat simplifies printer colour management over previous versions. To print without colour management applied, just select "No Color Management" in the "color handling" option.
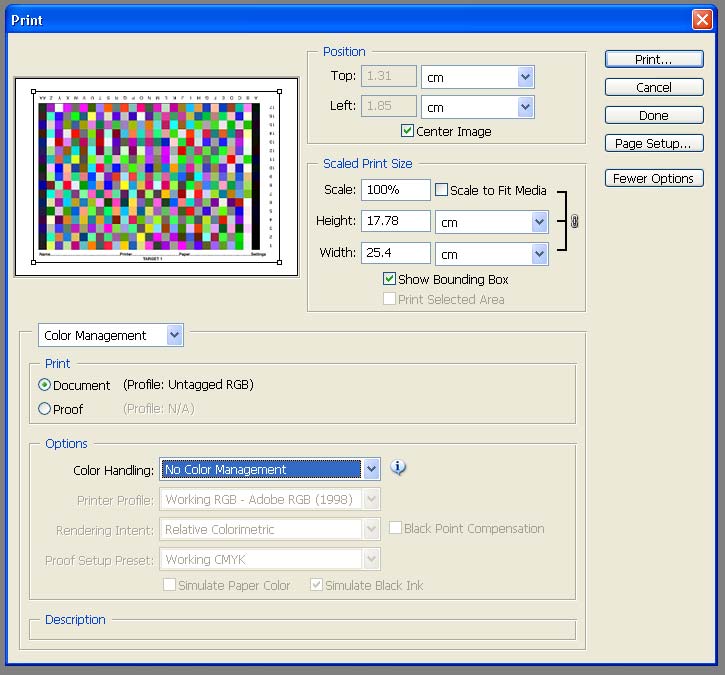
Like previous versions of Photoshop, when you've finished setting all the printer settings, double check the "color handling" setting, it often defaults back to a previous setting.
Photoshop CS3
Photoshop CS3 significantly improves printer management over previous versions. To print without colour management applied, just select "No Color Management" in the "colour management" option.
Please ensure 'scale fit to media' is NOT checked and that the document is showing as 'Profile:untagged RGB' in the print box.

Like previous versions of Photoshop, when you've finished setting all the printer settings, double check the "color handling" setting, it often defaults back to a previous setting.
Photoshop CS4
Photoshop CS4 is very similar to version CS3. To print without colour management applied, just select "No Color Management" in the "colour management" option.
Please ensure 'scale fit to media' is NOT checked and that the document is showing as 'Profile:untagged RGB' in the print box.
Like previous versions of Photoshop, when you've finished setting all the printer settings, double check the "color handling" setting, it often defaults back to a previous setting.
Photoshop Elements Colour settings (all versions)
It's important that no colour management is ever applied to the target files prior to printing.
In Photoshop Elements this is controlled by the 'Color settings dialogue' found in the edit menu.
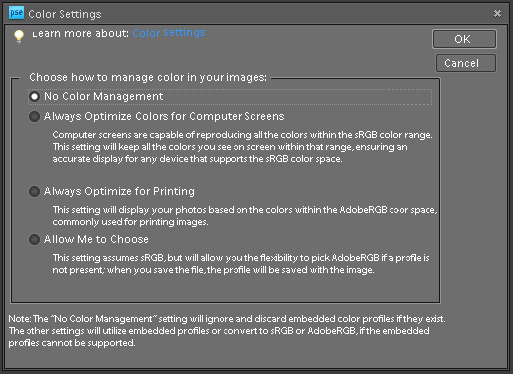
The setting you need to select is 'No color management'
The above screen shot is from Photoshop Elements 8, but all previous versions have a similar options box.
After you've printed the targets you'll need to return to your normal printing setting, either 'Always optimize for printing' or 'Allow me to Choose'
Photoshop Elements 2
When you've finished setting all the printer settings, double check the "Print Space: Profile" setting, it often defaults back to a previous setting.
Then print the targets.
Photoshop Elements 3, 4
Makes sure you've turned on colour management from the Edit menu; go to Color Settings. From the dialogue box choose "Full color management - optimised for print"
To print the target load the files into Photoshop Elements and then open Print Preview option on the File menu.
Click the "Show More Options" box on the bottom left of the window.
In the drop down box choose "Color Management"
You should see the "Source Space" listed as Untagged RGB.
In "Print Space" select the profile "Same As Source"
Then set up the printer with the "Page Setup" dialogue as needed for your particular printer.
When you've finished setting all the printer settings, double check the "Print Space: Profile" setting, it often defaults back to a previous setting.
Then print the targets.
Photoshop Elements 6
Make sure you've turned off colour management from the Edit menu; go to Color Settings. From the dialogue box choose "No color management"
To print the target load the files into Photoshop Elements, ensure that no colour management is applied when opening the file, then choose the Print option on the File menu.
In the print dialogue select 'no color management' in the color handling option in the color management box.
Please ensure 'scale fit to media' is NOT checked and that the document is showing as 'Profile:untagged RGB' as the source space in the color management box.
When you've finished setting all the printer settings, double check the "Print Space: Profile" setting, it often defaults back to a previous setting.
Then print the targets.
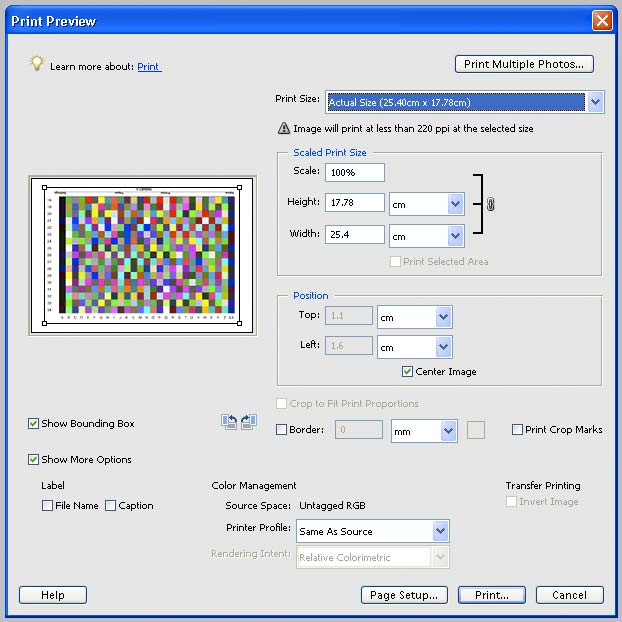
Photoshop Elements 8
Make sure you've turned off colour management from the Edit menu; go to Color Settings. From the dialogue box choose "No color management"
Then load the target files into Photoshop Elements, ensure that no colour management is applied when opening the file, then choose the Print option on the File menu.
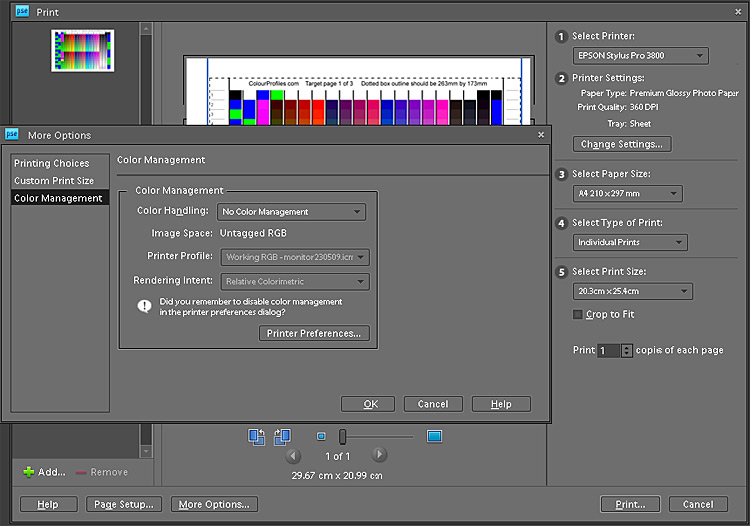
Choose 'individual print' (option number 4), 'Actual size' for the print size (option number 5), Crop to fit NOT checked.
Then click on 'More Options' and go to 'Color management'
Select No Color Managemnet in the color handling option box,
Check that Image space is reported as 'untagged RGB'
The other options should be grayed out.
When you've finished setting all the printer settings, double check the "Print Space: Profile" setting, it often defaults back to a previous setting. Then print the targets.
Lightroom 1 and 2
Printing profiling targets from Lightroom is NOT recommended. Please use another program such as Photoshop or Photoshop Elements that allows greater control over the printing process.
Picture Window Pro
PWP is a lesser known shareware image editing program of surprising power and capability. It has full colour management built into the program that is easy to find and set up.
From the file menu; choose Color Management;
In the color management dialogue box the entire colour management system can be easily configured.
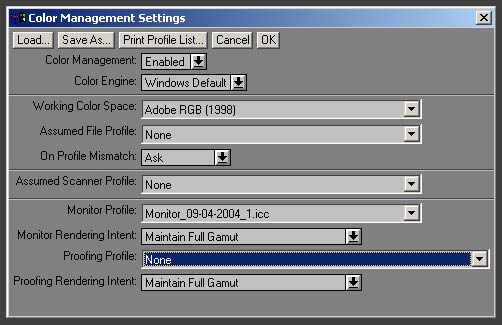
Color management: Enabled
Color engine: Windows default
Working color space: Adobe RGB(1998)
Assumed file profile : None
On profile mismatch: Ask
Assumed scanner profile: None
Monitor profile: (as appropriate)
Monitor rendering intent: maintain Full Gamut
Proofing profile: None
Proofing rendering intent: maintain Full Gamut
Qimage
Qimage is another lesser known shareware program that provides full colour management when printing. The interface is quite complex and difficult for novices to easily understand, however it does keep many of the important features, like colour profiles selected, obviously in view on the main program interface.
So all that needs to be done is to set Ptr ICC: to OFF and no profile will be imposed on the targets.
It's worth noting that Qimage is the only program that allows a complete set up of program AND driver printing settings to be saved and recalled. Whilst incredibly useful, this means that you will have to recheck the printer properties to ensure that colour management is switched off in the printer driver in addition to the imaging program.
Paint Shop Pro
Whilst paint Shop Pro claims to be a fully colour managed program, its implementation leaves very much to be desired. There is also room for confusion as it uses different terms for functions to other programs.
To enable Colour management
File > Preferences > Color management > Enable color management;
Choose: Basic color management
Monitor profile: (as appropriate)
Printer profile: There should be nothing in this box, but see note below*
Rendering intent: Pictures
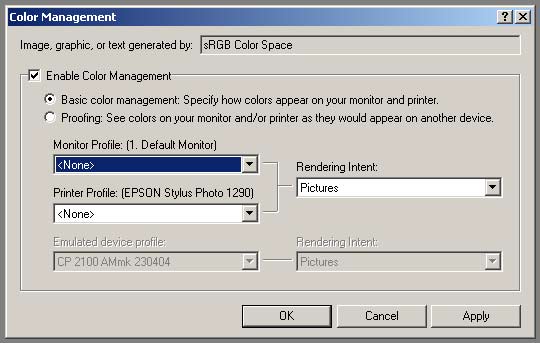
Paint Shop Pro will only offer the option of using the default printer's profiles as selected in the main Windows printer properties, unlike most other imaging programs. So you need to ensure that the printer you wish to profile is set as the system default, then access the color management option on the system printer properties.
Start button > Setting > Printers and Faxes > right click on the printer you wish to print from > on the color management tab: remove any profiles associated with the printer and select the manual profile configuration option on the driver.
Printer driver settings
The printer driver needs to be set NOT to use any colour management. Please read the instructions for each manufacturer and follow them exactly. The illustrations for this are taken from the Windows drivers for each manufacturer, Mac drivers will look slightly different, but have the same overall functions.
We try to keep this page up to date with screenshots for newer drivers, but increasingly we find it impossible to install drivers without the applicable printer actually attached to our system. Unfortunately it means these section of our site may not be as useful as we'd like it to be. If you're using a printer that uses a substantially different driver interface than those below please contact us for advice if you're unsure what settings to use.
Epson
Main Tab:
Media Type: (as appropriate)
Color: check color option
Mode: Custom Then click: Advanced: In the advanced dialogue box:
Check paper type is correct;
Color still selected;
Print Quality 1440 dpi(or appropriate);
Microweave unchecked;
Edge smoothing unchecked;
Flip horizontal unchecked;
High speed unchecked;
Finest detail unchecked;
Color Mangement; No Color Management checked
Paper config at defaults
Paper source; As appropriate
Paper Size; A4
Copies; 1
Orientation; Landscape (Rotate unchecked)
Printable area; Standard and centred
All unchecked
Epson 2100/220 printers.
If you have the grey balancer software installed please ensure that no correction is set in the grey balancer software options.
Latest Epsons
The latest Epson Stylus Photo printers like the R800 and R1800 have a newer printer driver design.
When you first use the driver you get the screen below, click on the advanced button to get to the important colour management settings.
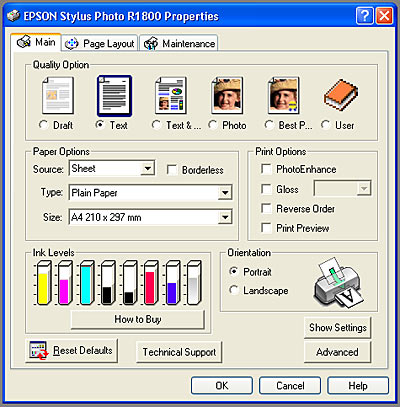
It's now worth checking the "Show this screen first" check box in the bottom right to save time in future.
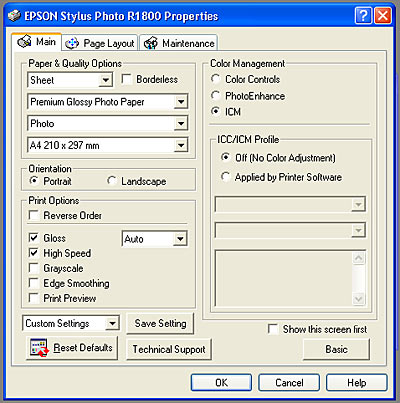
Main Tab:
In the "Color Management" box, select "ICM"
In the "ICC/ICM Profile" option select "Off (no color Adjustment).
Please ensure "Edge Smoothing" is turned OFF.
Canon
Select the printer you wish to print to in the "Page setup" dialogue box;Click on Properties;
In the printer properties dialogue box you will need to make the following settings on each tab.
Main Tab:
Select appropriate media type
Select appropriate media source
Print Quality: Select: Custom then "Set"
In Custom settings select:
Quality: Fine
Halftoning: Diffusion
Color Adjustment: Select: manual then "Set..."
Set all the color Balance options to the centre 0 position
DO NOT check ICM box
Select Print Type: NONE
Greyscale Printing: unchecked
Preview before printing: unchecked
Page Size: A4
Orientation: Landscape
Printing Type: Normal-size printing
Borderless printing: unchecked
Duplex printing: unchecked
Copies: 1
Nothing selected
Nothing selected
Nothing selected
Note: This tab/page is not connected with ICC/ICM colour printing profiles, it just saves a set of driver settings. You may find it useful to save the above settings as a default for printing with colour management in future.
Hewlett Packard
HP recommend setting the Color Space option on the color tab in their printer driver to "ICM enabled" when printing targets for profiling. And NOT applying a profile in the printing software.
Others
Please consult your printer documentation and set the printer driver NOT to apply any profile if possible.